
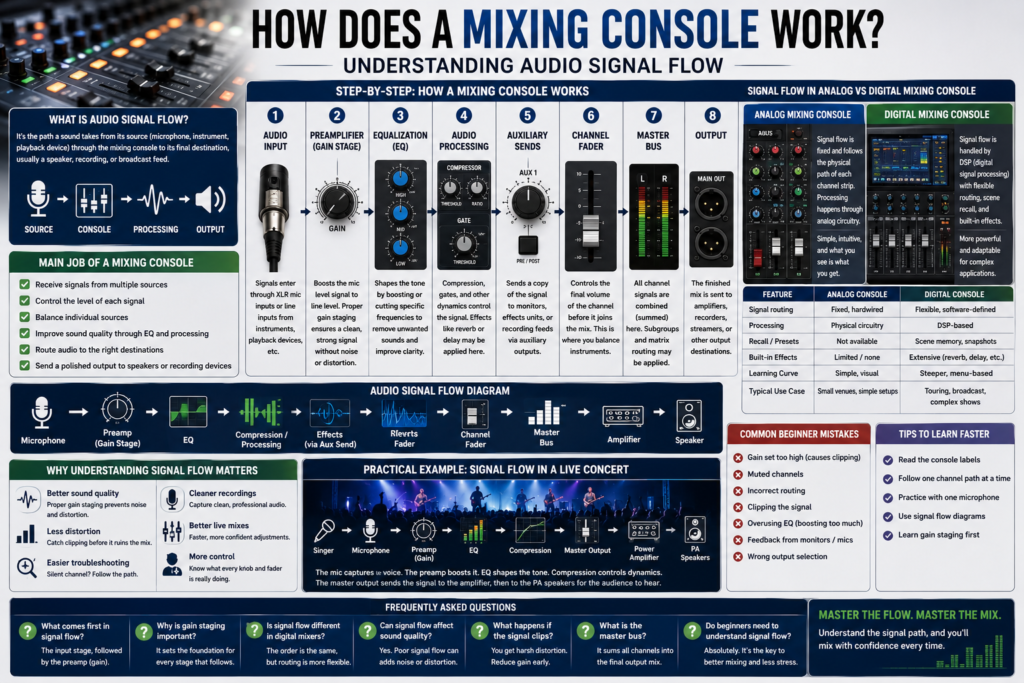
Every great mix, whether it’s a Sunday service, a sold-out club show, or a podcast recorded in a spare bedroom, depends on one thing most listeners never think about: signal flow. If you’ve ever stood behind a mixing console and wondered why a channel wasn’t making it to the speakers, or why a vocal sounded muddy no matter how many knobs you turned, the answer almost always comes down to understanding how audio actually moves through the system.
A mixing console isn’t just a wall of knobs and faders. It’s a signal path a series of stages that each shape the sound before it reaches your ears. Once you understand that path, troubleshooting stops feeling like guesswork and starts feeling like following a map. This guide breaks down exactly how a mixing console works, stage by stage, so you can mix with intention instead of trial and error.
What Is Audio Signal Flow?
Audio signal flow is simply the route a sound takes from its source a voice, an instrument, a playback device to its final destination, usually a speaker, recording, or broadcast feed. Along the way, that signal passes through several processing stages, each one shaping level, tone, or character.
Think of it like water moving through pipes. The source is the water supply, the mixing console is the network of pipes and valves, and the speakers are the faucet where everything finally comes out. If a valve is closed somewhere in that system, or a pipe is too narrow, the flow gets restricted or distorted before it ever reaches the tap. Signal flow works the same way: every stage a signal passes through is an opportunity to improve or ruin the sound.
Our Mixing Console Guide covers everything you need to know about choosing, using, and optimizing an audio mixer. Learn about analog and digital mixing consoles, audio signal flow, key features, channel configurations, and expert tips to help you select the right mixing console for live sound, recording studios, churches, podcasts, and professional audio applications.
What Is the Main Job of a Mixing Console?
At its core, a mixing console exists to take multiple audio sources and combine them into a single, balanced output. That means:
- Receiving signals from microphones, instruments, and playback devices
- Controlling the level of each signal so nothing overpowers the mix
- Balancing individual sources against each other
- Improving sound quality through EQ and processing
- Routing audio to the right destinations monitors, recordings, or the main PA
- Sending a polished final output to speakers or recording devices
Every mixing console, from a compact analog mixer to a full digital mixing console, performs these same core functions. The difference is in how much control and flexibility you get at each stage.
Step-by-Step: How a Mixing Console Works
Step 1: Audio Input
Every signal starts at an input. Microphones typically connect through XLR inputs, which carry a balanced, low-level mic signal that needs amplification. Instruments and playback devices often use TRS or line-level inputs, which are already at a higher, “line” level and don’t need as much boost. Knowing which input type you’re using matters plugging a mic into a line input (or vice versa) is a common source of weak or distorted signal.
Step 2: Preamplifier (Gain Stage)
Before anything else happens, the signal passes through a microphone preamp, which boosts a mic-level signal up to line level so the rest of the console can work with it properly. This is where gain staging begins setting the input level so it’s strong enough to sit above the noise floor but not so hot that it clips.
Too little gain, and you’ll hear hiss and noise. Too much, and the signal clips, producing harsh, unusable distortion. Getting this first stage right is arguably the single most important step in the entire signal chain, because every problem introduced here gets amplified by every stage that follows.
Step 3: Equalization (EQ)
Once the gain is set, the signal typically passes through EQ controls, which let you shape bass, mids, and treble. EQ is used to remove unwanted frequencies — like the boominess of a kick drum or the harshness in a vocal and to improve clarity so each instrument has its own space in the mix.
Step 4: Audio Processing
Many channels also route through additional processing: compression to control dynamic range, gates to cut unwanted noise between notes, and effects like reverb or delay. In a digital mixing console, this is handled by onboard DSP (digital signal processing), which can run multiple effects simultaneously without needing separate outboard gear.
Step 5: Auxiliary Sends
Auxiliary sends let you split a copy of the channel’s signal off to a separate destination — most commonly a monitor mix for the performer on stage, or an effects send routed to a reverb unit. Auxiliary sends are also frequently used to create a separate recording feed, independent of what the audience hears.
Step 6: Channel Faders
The channel fader is the volume control most people associate with a mixing console. This is where you balance instruments against each other in real time bringing a guitar solo up, pulling a background vocal down, adjusting on the fly as a live performance unfolds.
Step 7: Master Bus
After each channel fader, signals combine on the master bus the point where everything gets summed into a stereo (or multi-channel) output. Larger consoles also offer subgroups and matrix routing, letting you group several channels together (like a drum submix) before they hit the master bus.
Step 8: Output
Finally, the processed, balanced signal leaves the mixing console and heads to its destination: a power amplifier and speakers for live sound, a recording device for tracking, or a streaming encoder for broadcast. A powered mixing console combines the amplifier and mixer into a single unit, simplifying this final step for smaller venues.
Audio Signal Flow Diagram
Microphone
↓
Preamp (Gain Stage)
↓
EQ
↓
Compression / Processing
↓
Effects (via Aux Send)
↓
Channel Fader
↓
Master Bus
↓
Amplifier
↓
Speaker
Signal Flow in an Analog Mixing Console
On an analog mixer console, signal flow is largely fixed. Each channel strip follows the same hardwired path preamp, EQ, aux sends, fader and processing happens through physical circuitry rather than software. This makes analog consoles simple and intuitive: what you see on the panel is exactly what the signal is doing. The tradeoff is flexibility; routing changes require physical patching rather than a few taps on a screen.
Signal Flow in a Digital Mixing Console
A digital mixing console runs the same fundamental signal path, but through DSP instead of analog circuitry. This unlocks routing flexibility, recallable presets, scene memory, and built-in digital effects that would otherwise require racks of outboard gear.
| Feature | Analog Mixing Console | Digital Mixing Console |
| Signal routing | Fixed, hardwired | Flexible, software-defined |
| Processing | Physical circuitry | DSP-based |
| Recall/presets | Not available | Scene memory, snapshots |
| Built-in effects | Limited/none | Extensive (reverb, delay, etc.) |
| Learning curve | Simple, visual | Steeper, menu-based |
| Typical use case | Small venues, simple setups | Touring, broadcast, complex shows |
Why Understanding Signal Flow Is Important
Understanding audio signal flow pays off in ways that go far beyond knowing where to plug in a cable:
- Better sound quality — proper gain staging at each step prevents noise and distortion from stacking up
- Less distortion — knowing where clipping can occur helps you catch it before it reaches the speakers
- Easier troubleshooting — a silent channel becomes a simple checklist instead of a panic
- Cleaner recordings — signal flow awareness keeps recorded tracks free of unwanted noise and clipping
- Better live mixes — understanding routing means faster, more confident adjustments during a show
Common Signal Flow Mistakes Beginners Make
- Gain set too high — causes clipping and harsh distortion. Solution: set gain so peaks sit comfortably below the clip point.
- Muted channels — a channel that seems “dead” is often just muted or routed incorrectly. Solution: check mute status and routing before assuming a hardware fault.
- Incorrect routing — sending a channel to the wrong bus or output. Solution: trace the signal path methodically, one stage at a time.
- Clipping — distortion caused by a signal exceeding the system’s headroom. Solution: reduce gain at the earliest stage where the clipping occurs.
- EQ misuse — boosting too many frequencies instead of cutting problem areas. Solution: cut before you boost.
- Feedback — often caused by monitor or aux send levels fighting with live microphones. Solution: check aux send levels and mic placement first.
- Wrong output selection — audio routed to the wrong physical output or recording track. Solution: confirm output assignments before a show or session begins.
Practical Example: Signal Flow During a Live Concert
Picture a singer stepping up to a microphone during a live concert. The signal flow looks like this:
Singer → Microphone → Mixing Console → EQ → Compression → Master Output → Power Amplifier → PA Speakers
The microphone captures the voice and sends a mic-level signal into the console. The preamp boosts it, gain staging keeps it clean, and EQ carves out space so the vocal cuts through the band. Compression smooths out dynamic peaks so a sudden loud note doesn’t jump out unexpectedly. From there, the signal joins the master output, gets sent to the power amplifier, and finally reaches the PA speakers as sound the audience hears. Every stage along that path is an opportunity for the sound engineer to shape or accidentally damage the final result.
Signal Flow Inside a Home Recording Studio
In a home recording studio, the same principles apply on a smaller scale. A microphone feeds into an audio interface, which handles preamp and gain staging much like a console does. From there, the signal can pass through a mixer (physical or software-based) before landing in a DAW (digital audio workstation), where it’s recorded, edited, and mixed. Finally, monitors let you hear the result. Even without a traditional mixing console in the room, the signal flow concept input, gain, processing, output remains exactly the same.
Tips for Learning Mixing Console Signal Flow Faster
- Read the console labels — most channel strips are labeled in the order the signal actually flows
- Follow one channel path at a time — trace a single microphone from input to master bus before worrying about the whole board
- Practice with one microphone — simplify the variables while you build muscle memory for gain staging and EQ
- Use signal flow diagrams — a visual reference reinforces the order of operations
- Learn gain staging first — it’s the foundation every other stage depends on
Frequently Asked Questions
How does a mixing console process sound?
It receives an input signal, boosts it through a preamp, shapes it with EQ and processing, routes it through faders and buses, and sends a final balanced signal to an output like speakers or a recording device.
What comes first in signal flow?
The input stage comes first, followed immediately by the preamp, which sets the gain before any further processing happens.
Why is gain staging important? Gain staging sets the foundation for every stage that follows. Poor gain staging introduces noise or distortion that gets carried and often amplified through EQ, processing, and the master bus.
Is signal flow different in digital mixers?
The fundamental order of operations is the same, but a digital mixing console handles processing through DSP and offers far more routing flexibility than fixed analog circuitry.
Can signal flow affect sound quality?
Yes. Every stage a signal passes through can either preserve or degrade quality, so understanding the path helps you catch problems before they reach the audience or a recording.
What happens if the signal clips?
Clipping introduces harsh, unwanted distortion because the signal has exceeded the system’s headroom. It’s usually fixed by reducing gain at the stage where the clipping originates.
What is the master bus?
The master bus is the point where all channel signals are summed together into the final stereo (or multi-channel) output before leaving the console.
Do beginners need to understand signal flow?
Yes signal flow is the foundation of confident mixing. Without it, troubleshooting becomes guesswork, and sound quality suffers as a result.