
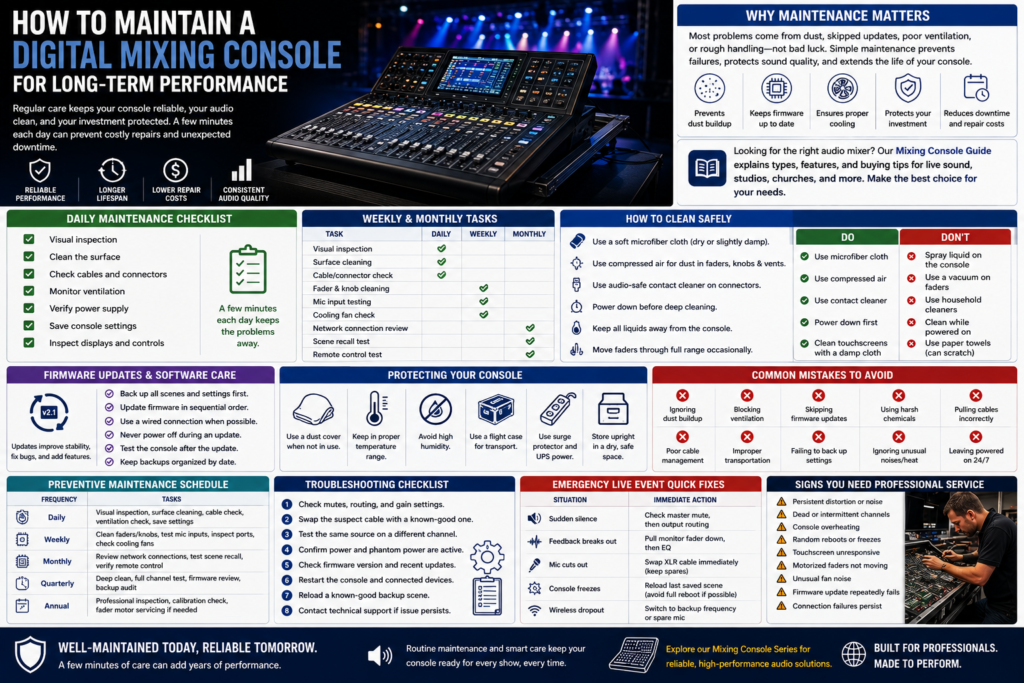
A digital mixing console is a serious investment, and like any piece of precision equipment, it performs best when it’s cared for consistently. Most premature failures don’t come from bad luck they come from dust buildup, skipped firmware updates, blocked ventilation, or rough handling during transport.
The good news is that proper care doesn’t take much time. A few minutes of daily attention and a short weekly or monthly routine can add years to a console’s working life and keep audio quality consistent show after show. This guide covers exactly what that routine should look like, from daily checks to firmware updates to knowing when it’s time to call a technician.
If you’re looking for the right audio mixer, our Mixing Console Guide explains the different types of mixing consoles, key features, and buying tips to help you choose the best solution for live events, studios, churches, and professional audio applications. Explore the guide to make an informed purchasing decision and find the ideal mixing console for your needs.
Why Digital Mixing Console Maintenance Matters
Regular maintenance keeps a digital mixing console performing reliably, extends its working lifespan, and reduces the risk of costly repairs. Clean connections, updated firmware, and proper ventilation protect audio quality and prevent the unexpected failures that disrupt live events, recordings, and broadcasts.
Think of maintenance as cheap insurance. A five-minute cable check before a show costs nothing. A dead channel mid-performance costs credibility, and a full board repair costs real money. Consoles that are cleaned, updated, and stored properly routinely outlast neglected ones by years.
Daily Maintenance Checklist
Build these into the start or end of every session, whether you’re running a live sound mixer, a studio mixer, or a church sound system.
- Visual inspection – Look over the console for loose cables, dust buildup, or anything out of place.
- Clean the surface – Wipe down faders, knobs, and the chassis with a soft, dry or slightly damp microfiber cloth.
- Check cables and connectors – Confirm XLR and line inputs are seated properly with no visible fraying.
- Monitor ventilation – Make sure vents and cooling fans aren’t blocked by cases, cloths, or cables.
- Verify power supply – Check that power connections are secure and the console powers up cleanly.
- Save console settings – Back up the current scene before shutting down, especially after making changes.
- Inspect displays and controls – Confirm the touchscreen display and motorized faders respond correctly.
Printable Daily Checklist
- [ ] Visual inspection complete
- [ ] Surface wiped down
- [ ] Cables and connectors checked
- [ ] Ventilation clear
- [ ] Power supply verified
- [ ] Settings/scene backed up
- [ ] Display and controls tested
Weekly and Monthly Maintenance Tasks
Beyond daily checks, a few deeper tasks keep a mixer console digital system in top shape.
- Clean faders and knobs – Remove dust that builds up around fader tracks and rotary controls.
- Test microphone inputs – Run a quick signal through every channel to confirm all preamps are working.
- Inspect XLR and USB ports – Check for bent pins, looseness, or corrosion.
- Check cooling fans – Listen for unusual noise and confirm airflow is unobstructed.
- Review network connections – Test Dante or AES50 links if the console is part of a networked system.
- Test scene recall – Load a few saved scenes to confirm motorized faders and settings recall correctly.
- Verify remote control functionality – Confirm Wi-Fi control and tablet mixing apps still connect properly.
| Task | Daily | Weekly | Monthly |
| Visual inspection | ✔ | ||
| Surface cleaning | ✔ | ||
| Cable/connector check | ✔ | ||
| Fader and knob cleaning | ✔ | ||
| Mic input testing | ✔ | ||
| Cooling fan check | ✔ | ||
| Network connection review | ✔ | ||
| Scene recall test | ✔ | ||
| Remote control test | ✔ |
How to Clean a Digital Mixing Console Safely
Cleaning protects both the look and the function of a console, but the wrong products can cause real damage.
- Use a soft, lint-free microfiber cloth for the chassis and touchscreen display.
- For touchscreens, lightly dampen the cloth with water or a screen-safe cleaner — never spray liquid directly onto the console.
- Use compressed air to clear dust from around faders, knobs, and vents.
- Clean XLR and line connectors with a dry contact cleaner made for audio equipment, not household cleaners.
- Move motorized faders gently through their full range occasionally to prevent dust from settling in the track.
- Keep all liquids well away from the console, and never clean while it’s powered on.
| Do | Don’t |
| Use a dry or slightly damp microfiber cloth | Spray liquid cleaner directly onto the console |
| Use compressed air for dust in tight spaces | Use a vacuum directly on faders (static risk) |
| Use audio-safe contact cleaner on connectors | Use household glass or surface cleaners |
| Power down before deep cleaning | Clean a powered-on console |
| Clean touchscreens with a soft, slightly damp cloth | Use paper towels, which can scratch the screen |
Firmware Updates and Software Maintenance
Firmware updates aren’t just about new features they patch bugs, improve stability, and sometimes fix real reliability issues.
- Why updates matter – Manufacturers regularly release firmware update files that improve performance and fix known bugs.
- Safe update procedure – Always update in sequential order, using a wired connection where possible, and never power off the console mid-update.
- Back up settings first – Export all scenes and configurations to a USB drive before starting any update.
- Restoring configurations – Keep saved backups organized by date so you can roll back quickly if a new firmware version causes an issue.
- Follow manufacturer recommendations – Check the manufacturer’s site periodically rather than assuming your console notifies you of every update.
Protecting Your Mixing Console from Damage
Environmental and handling factors cause a large share of console damage that has nothing to do with normal wear.
- Dust protection – Use a dust cover when the console isn’t in use, especially in venues with a lot of foot traffic.
- Temperature control – Keep the console within its rated operating temperature range; avoid direct sun or unheated storage in freezing conditions.
- Humidity management – High humidity can corrode connectors and damage internal components over time.
- Proper transportation – Always use a flight case rated for the specific console model during touring or transport.
- Surge protection – Run the console through a quality surge protector to guard against power spikes.
- UPS power backup – A UPS keeps the console running through brief power interruptions and protects against dirty power.
- Safe storage – Store consoles upright, away from moisture, and with faders/knobs protected from pressure.
Common Maintenance Mistakes to Avoid
- Ignoring dust buildup – Dust in faders and vents leads to noisy controls and overheating over time.
- Blocking ventilation – Stacking gear or cases against vents causes heat to build up internally.
- Skipping firmware updates – Outdated firmware leaves known bugs and stability issues unresolved.
- Using harsh cleaning chemicals – Household cleaners can strip coatings and damage touchscreens.
- Pulling cables incorrectly – Yanking a cable by the wire instead of the connector damages both the cable and the port.
- Poor cable management – Tangled or strained cables lead to premature connector failure.
- Improper transportation – Transporting a console without a proper flight case risks physical damage to faders and the chassis.
- Failing to back up settings – Losing scenes to a failed update or reset costs hours of rebuild time.
- Ignoring unusual noises or overheating – A new fan noise or warm chassis is an early warning sign, not something to dismiss.
- Leaving equipment powered on continuously – Constant power cycling stress without rest periods can shorten component lifespan.
Signs Your Digital Mixing Console Needs Professional Servicing
Some issues go beyond routine cleaning and settings checks and call for a qualified technician.
| Warning Sign | Recommended Action |
| Persistent audio distortion | Have preamps and output stages professionally tested |
| Dead or intermittent channel | Check cables first, then have the channel inspected internally |
| Overheating chassis | Stop use, check ventilation, and have cooling system inspected |
| Random reboots | Have power supply and firmware integrity checked professionally |
| Touchscreen unresponsive or glitching | Schedule a service inspection of the display assembly |
| Motorized fader sticking or not moving | Have fader motors and tracks professionally cleaned or replaced |
| Unusual fan noise | Have the cooling fan inspected or replaced |
| Repeated connection failures (Dante/USB) | Have network and USB hardware tested by a technician |
| Firmware update repeatedly fails | Contact manufacturer support before attempting further updates |
Preventive Maintenance Schedule
| Frequency | Tasks |
| Daily | Visual inspection, surface cleaning, cable check, ventilation check, save settings |
| Weekly | Clean faders/knobs, test mic inputs, inspect ports, check cooling fans |
| Monthly | Review network connections, test scene recall, verify remote control |
| Quarterly | Deep clean, full channel test, firmware version review, backup audit |
| Annual | Professional inspection, calibration check, fader motor servicing if needed |
Maintenance Checklist Before Every Event
- [ ] Confirm firmware is up to date and stable
- [ ] Load and test the correct saved scene
- [ ] Check all mic and line inputs for signal
- [ ] Inspect cables for wear or looseness
- [ ] Confirm Wi-Fi/tablet control connects properly
- [ ] Verify backup power (UPS/surge protector) is in place
- [ ] Pack in a proper flight case for transport
| Environment | Maintenance Emphasis |
| Recording Studio | Firmware stability, DAW integration checks, dust control |
| Church / House of Worship | Scene recall testing, volunteer-friendly backups, weekly cleaning |
| Live Events / Touring | Flight case handling, pre-show checklist, surge/UPS protection |
| Broadcast Facility | Redundant power checks, network connection audits, uptime monitoring |
Frequently Asked Questions
How often should I clean a digital mixing console?
A light daily wipe-down plus a deeper weekly cleaning of faders and knobs is enough for most consoles in regular use.
How long does a digital mixing console last?
With proper care, a well-built digital mixing console typically lasts 10 to 15 years or longer.
Can dust damage a mixer?
Yes — dust buildup in faders, knobs, and vents can cause noisy controls, stuck faders, and overheating over time.
Should I update firmware regularly?
Yes, but always back up your settings first and update in sequential order rather than skipping versions.
Is a UPS necessary?
A UPS isn’t strictly required, but it’s strongly recommended for live events and broadcast use where a power interruption could cause serious disruption.
How do I store a mixer safely?
Store it upright, in a dust cover or flight case, away from moisture and temperature extremes.
What cleaning products are safe?
A dry or slightly damp microfiber cloth, compressed air, and audio-safe contact cleaner are all safe; avoid household chemical cleaners.
How often should I back up console settings?
Back up before every show and before every firmware update, at minimum.
What causes digital mixers to overheat?
Blocked ventilation, dusty internal components, and poor storage conditions are the most common causes of overheating.
Can moisture damage a mixer?
Yes — moisture can corrode connectors and damage internal electronics, so consoles should always be kept dry.
When should I replace cables?
Replace any cable showing fraying, exposed wire, intermittent signal, or connector damage right away.
When should I contact a service technician?
Contact a technician when distortion, dead channels, overheating, or firmware errors persist after basic troubleshooting steps.
What’s the difference between maintaining an analog mixer and a digital mixing console?
Analog maintenance focuses mainly on physical components and cables, while digital consoles also need firmware updates and software backups.
Does a small mixing console need the same maintenance as a large one?
Yes — even a small 4 channel mixing console or 6 channel mixing console benefits from the same cleaning and inspection routine, just on a smaller scale.
Can proper maintenance really extend a mixer’s lifespan?
Yes — consistent cleaning, firmware updates, and safe storage are the biggest factors separating consoles that last over a decade from those that fail early.
Conclusion
Keeping a digital mixing console reliable over the long run comes down to consistency: regular cleaning, timely firmware updates, careful handling during transport, and a proper storage environment. None of these tasks take much time individually, but together they prevent the vast majority of premature failures.
A well-maintained professional audio mixing console delivers dependable performance for live events, recording studios, broadcast facilities, and houses of worship for years longer than one that’s neglected.
Looking for equipment built to last? Explore our Mixing Console Series for professional digital audio solutions designed for long-term reliability.